Published on 04/19/2024
Published by Pratik Takle
IOS App Building | React Native
Getting started with React Native development requires the installation of the following dependencies for iOS:
- React Native CLI: A built-in build tool for React Native. It does not require a separate installation.
- Node: A multi-platform and open-source JavaScript runtime environment. If you already have Node installed on your macOS, update it to version 16 or later.
- Watchman: An open-source service that watches and records files for changes. Installing Watchman ensures a better performance of changes in your project’s file system.
Prerequisites
You should have the latest macOS version Ventura or Sonoma to complete the tutorial successfully. The following applications are also required:
- VS Code: The actual development environment.
- Terminal: A command line interface built into macOS.
- Xcode: For configuring the iOS version of the app.
- Android Studio: For configuring the necessary dependencies for Android.
Step 1: Install Node and Watchman
- Before we can start writing our React Native application, we must ensure that our machine has the appropriate tooling to build our app.
- As we are using React Native, we need to have NodeJS installed as well as Watchman to rebuild our application on code changes.
- Note: We use Homebrew on MacOS to manage our NodeJS install. If you don’t have Homebrew installed, it can be downloaded from here.
- Install brew – https://brew.sh/
- if failed try this solution – https://github.com/orgs/Homebrew/discussions/4069
- still failed, try to switch your wifi to the cellular network.
Step 2: Install iOS Dependencies
- I assume you have already downloaded and installed Xcode and the other tools outlined in the prerequisites section. The project in this article uses Xcode version 15. However, you can use version 13 or later. The iOS dependency for running React Native projects has three main configurations.
- Install Xcode Command Line Tools and Cocoapods: Running the React Native project on iOS requires Xcode Command Line Tools and dependency manager (Cocoapods).
- Open the Terminal and run
xcode-select --installto start the installation. The above command also installs Cocoapods. - Use
pod --versionto verify the Cocoapods installation in the Terminal or install it withsudo gem install cocoapods. The command above uses the RubyGems package management framework to install Cocoapods. - Launch Xcode, go to Settings… -> Locations to check the version of Command Line Tools installed.

- Install Xcode simulators and devices: To prepare your React Native project to run on iOS, you should install simulators and configure actual iOS devices to run the project. Check which simulators and devices you have set up for the development with the Xcode shortcut
shift + cmd + 2or click Window -> Devices and Simulators in the Xcode toolbar. - Set the project’s Bundle Identifier in Xcode: To be able to run the React Native project on iOS, the app should be uniquely identified by Xcode when you run it. You can add this configuration by setting the project’s Team and Bundle Identifier in Xcode.
- The section Create a New React Native Project of this tutorial shows you how to create the project with the name NativeCall. Let’s use it for demonstration. When you create a React Native project, it generates an iOS version in the iOS folder.
- You can open this iOS version of the project in Xcode by navigating to the iOS folder and clicking the
.xcworkspacefile. For the demo project in this article, we haveNativeCall.xcworkspace. When you open it in Xcode, you can set the team and bundle identifiers for the app and test targets. 
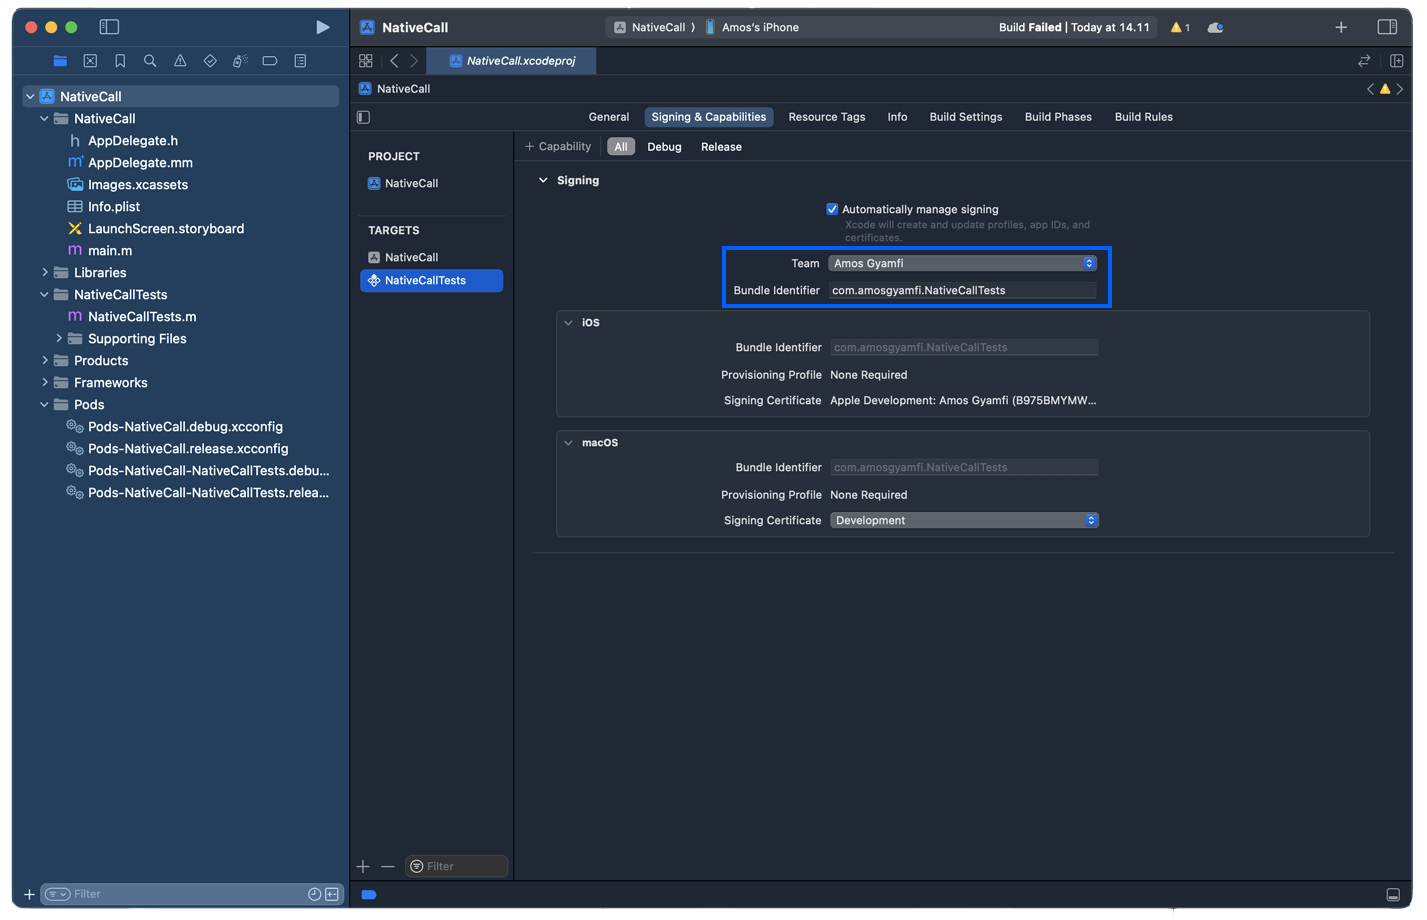
- First, select the project’s name (NativeCall) in the left Navigator and head to Signing & Capabilities. Under TARGETS, you should choose the generated targets. In this context, set your team and bundle identifiers for NativeCall and NativeCallTests.Note: The team and bundle identifiers must be the same for the app and test targets.
Step 2: Install iOS Dependencies
- Navigate to your project ios folder.
- perform
1"pod install".
- resolve you errors, find solutions at – https://awxdocs.com/tutorials/error-solving-ios-app-building-react-native/